Virtual Reality
1. Immersive Indoor Cycling Project, 2017 summer
1.4 360-degree panorama video
The goal of this immersive 3D video project is to provide a riding experience that feels like a game for the riders to immerse themselves during the journey. The writer was hired as the developer of this immersive video by an indoor cycling studio, SPINCULT.
Though the demo on the left lasts only few seconds, the duration of the whole project video is about 40 minutes, which takes two loops of the virtual environment as shown below. The video will be display on a large curved screen to bring an immersive experience for riders in front of it.
On the left corner, a speed indicator can show real-time speed of a rider in miles per hour. Because it has not been connected to any input devices yet, right now the speed is just a random number between 23 and 25 mph, which can be easily fixed by changing few lines of code once the input is ready. On the right corner, a mini-map indicates the position of the rider in a local area inside the virtual environment, which will provide users with some hints about what will be experiencing in few seconds.
1.1 Virtual Environment

The virtual environment is completed with the Unity Engine version 5.6.1f. Most models and textures such as trees and grasses are imported from several customized packages in Unity asset store. The standard package, the default package in Unity, is frequently used by the writer. For this project, the environment as well as the particle sub-package are specially useful.
Besides Unity, 3ds Max and Photoshop are also used for editing 3d models and textures, respectively. SketchUp, another 3d model editing software, is preferred by the writer for creating own models according to its ease of use.
Currently the video cannot be considered as a virtual reality product due to the lack of differentiating views of left and right eyes. However, in the writer's understanding, the only gap between this project to a literally virtual reality product is the different rendering way. For instance, if the project will be displayed on a head-mounted display, such as HTC-Vive, once a steamVR plugin is correctly imported and well set up, certain virtual reality application is successfully rendered. Another case, for a CAVE (Cave Automatic Virtual Environment) system, the middleVR plugin is necessary.
There are two separate windows in the figure above. The left side one is the scene view, the right side one is the game view. As shown in the scene view, the whole virtual environment looks like a square surrounded by some regions of trees. The white line represents the trajectory of the movement of the virtual rider. The trajectory that finally used in the video was pre-recorded by a customized package in Unity asset store, which will set up a series of nodes in the virtual environment and then adjust their directions and relative positions to achieve a smooth trajectory. The process of editing the nodes takes a lot of time especially in the irregular areas (e.g. upper-right region in the figure), which adds another dimension, z (i.e. y in Unity), besides x and y (i.e. x and z in Unity).
1.2 Fall Scenario
Before making the final video, which is the summer scenario, the writer has tried some other scenarios. The fall scenario is one of them.
As the video shown on the left, the theme is the season - fall. The skybox is changed to a dusk style to better fit in required lighting and atmosphere of this scenario. Moreover, some fog is distributed around the trees to create the feeling of mystery. Birds, another particle system besides the fog, provides vitality.
The road may look ugly at first glance. It was the first try of the writer to create specific textures for Unity by Photoshop after obtained asphalt photos online.
1.3 The Great Wall Scenario
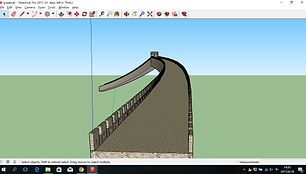

The Great Wall is another scenario before the summer one. The writer thinks that taking a virtual ride on the Great Wall will be a special experience other than cycling in the forest.
Different from the previous scenario (i.e. the fall scenario), the writer had to start from "0" to create the virtual environment for this scenario, which is making own models. Making a single piece of brick, adding materials and textures to it, instantiating it to get a bigger model like a rampart and an observation post have enriched the experience of the writer's use of SketchUp.
the observation post
the Great Wall model
Panorama photo, namely, covers all degrees of view from the camera in the scene. A 360-degree panorama video similarly provides full views every single second or even frame (usually virtual reality applications take 72 frames per second). When watching a 360-degree panorama video, user can click and hold on the cursor and drag to see different views on PC platforms. Thanks to the gyroscopes on the mobile devices, users can more easily get full views on mobile platforms with just turning their phones.
Recording each 1-minute 360-degree panorama video costs the writer an hour to finish with Unity. Because it is necessary to take at least 24 frames per second for later integration of a smooth video rather than discrete images, while in this case the writer set the number to 36, half of the required amount of frames per second by usual virtual reality products. In order to get a 360-degree panorama video, each photo taken every frame needs to be a panorama photo, which almost contains many time of information than ordinary photo. Therefore, the raw panorama video (only one-minute length) contains lots of information and has a size of 80 Gigabytes.
The left-side video shows another scenario, winter scenario. The right-side video is the panorama video of the fall scenario. Please enjoy them!
(Try to click, hold on the mouse, then drag the cursor to get different angle of view if using a PC;
try to turn or rotate the screen, if using a mobile device.)
Note: these are 360-degree panorama videos.
1.5 Some thoughts
This projects provides the writer with a better understanding of the gap of ideas between the designer and the customer. If a reader gets this part, he/she may ask why you only use the summer scenario although made other scenarios as well. Because at first, the designer (i.e. the writer) assumed to make four scenarios (corresponding to the four seasons) for this project; however, the summer scenario apparently is what the customer really wants to be displayed due to the timing.
Scenes, lighting, models, textures, skyboxes, materials, scripting with C#, utilizing customized packages, and many other things integrated together achieves every scenario. The writer gets much familiarity with Unity and other relevant softwares thanks to the projects because he almost used Unity everyday.
The writer will pay more attention to the communication between himself and the supervisor (e.g. boss or customer) in the future.
1.6 Acknowledgments
The project is sponsored by SPINCULT and supported by the Duke immersive Virtual Environment lab.